React Native Video — handling fullscreen and controls on Android
How to make a custom solution for fullscreen React Native Video on Android.


Coming from web development and with a bit of background with PWA, I wasn’t really prepared for mobile development in a way that things (mostly) work better on iOS than on Android.
Using react-native-video, I didn’t expect it to work “out-of-the-box”, but was blown away with the difference in behavior on iOS and Android.
iOS works perfectly fine since it’s a wrapper around QuickTime, but Android is lacking a lot of features out of the box. All that is required for iOS to work perfectly is this:
export const VideoPlayer: React.FC = () => {
return (
<View style={styles.container}>
<Video
source={{
uri:
'http://commondatastorage.googleapis.com/gtv-videos-bucket/sample/BigBuckBunny.mp4',
}}
style={styles.video}
controls={true}
resizeMode={'cover'}
/>
</View>
);
};
const styles = StyleSheet.create({
container: {
flex: 1,
backgroundColor: '#ebebeb',
},
video: {
width: Dimensions.get('window').width,
height: Dimensions.get('window').width * (9 / 16),
backgroundColor: 'black',
}
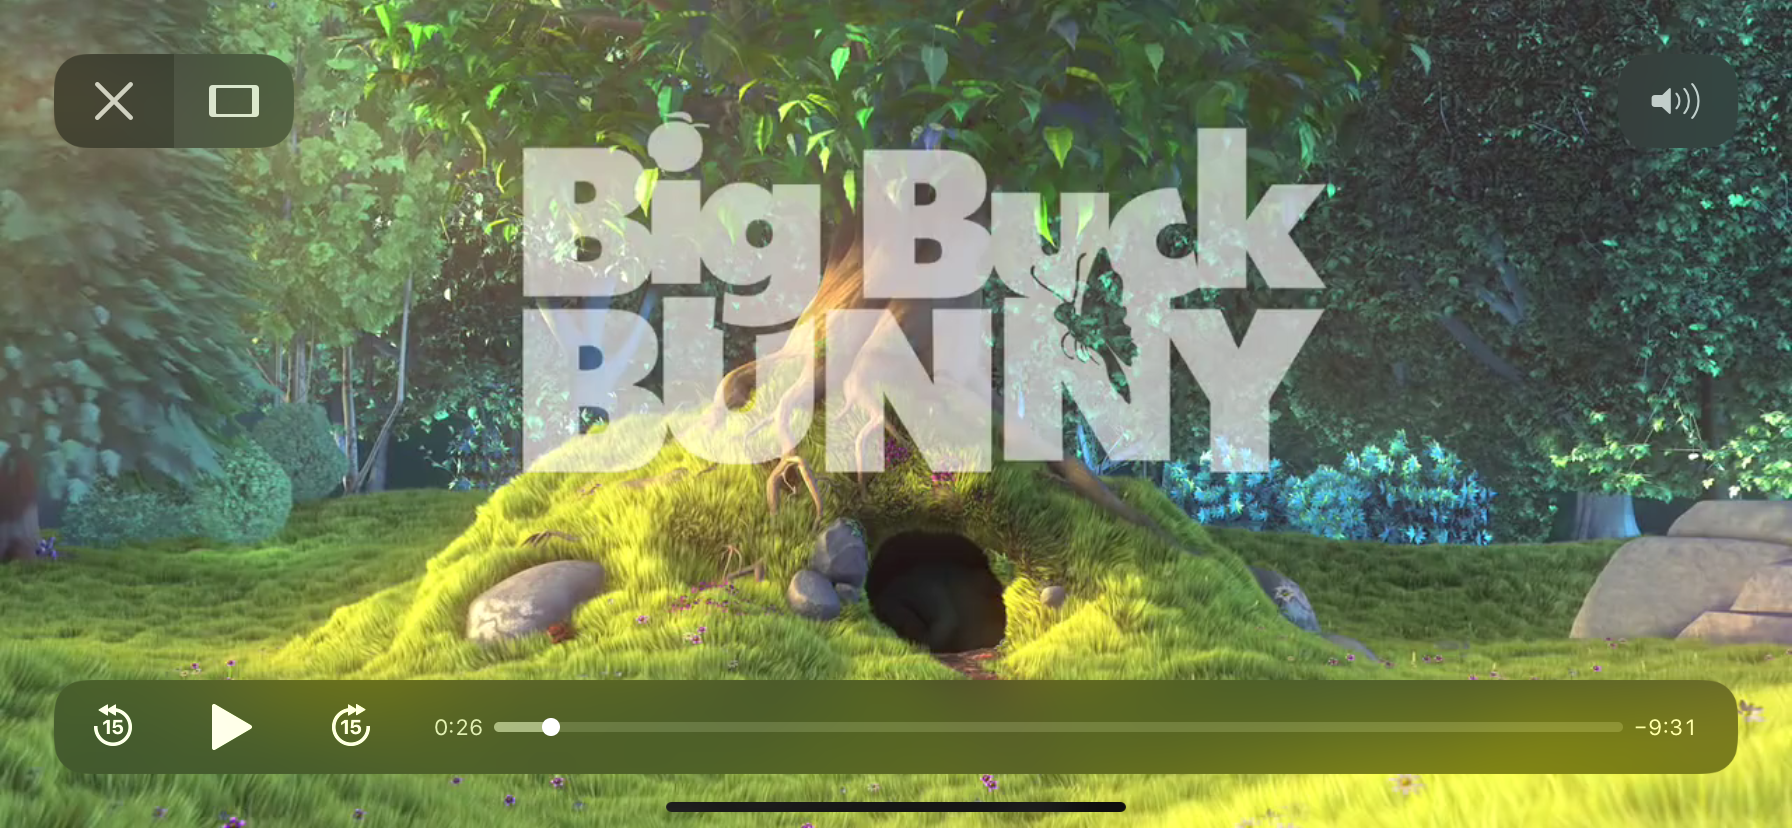
});On Android, however, there is a lot of ground you have to cover to end up with the same set of features. As you can see, Android does not have fullscreen controls in any shape or form.
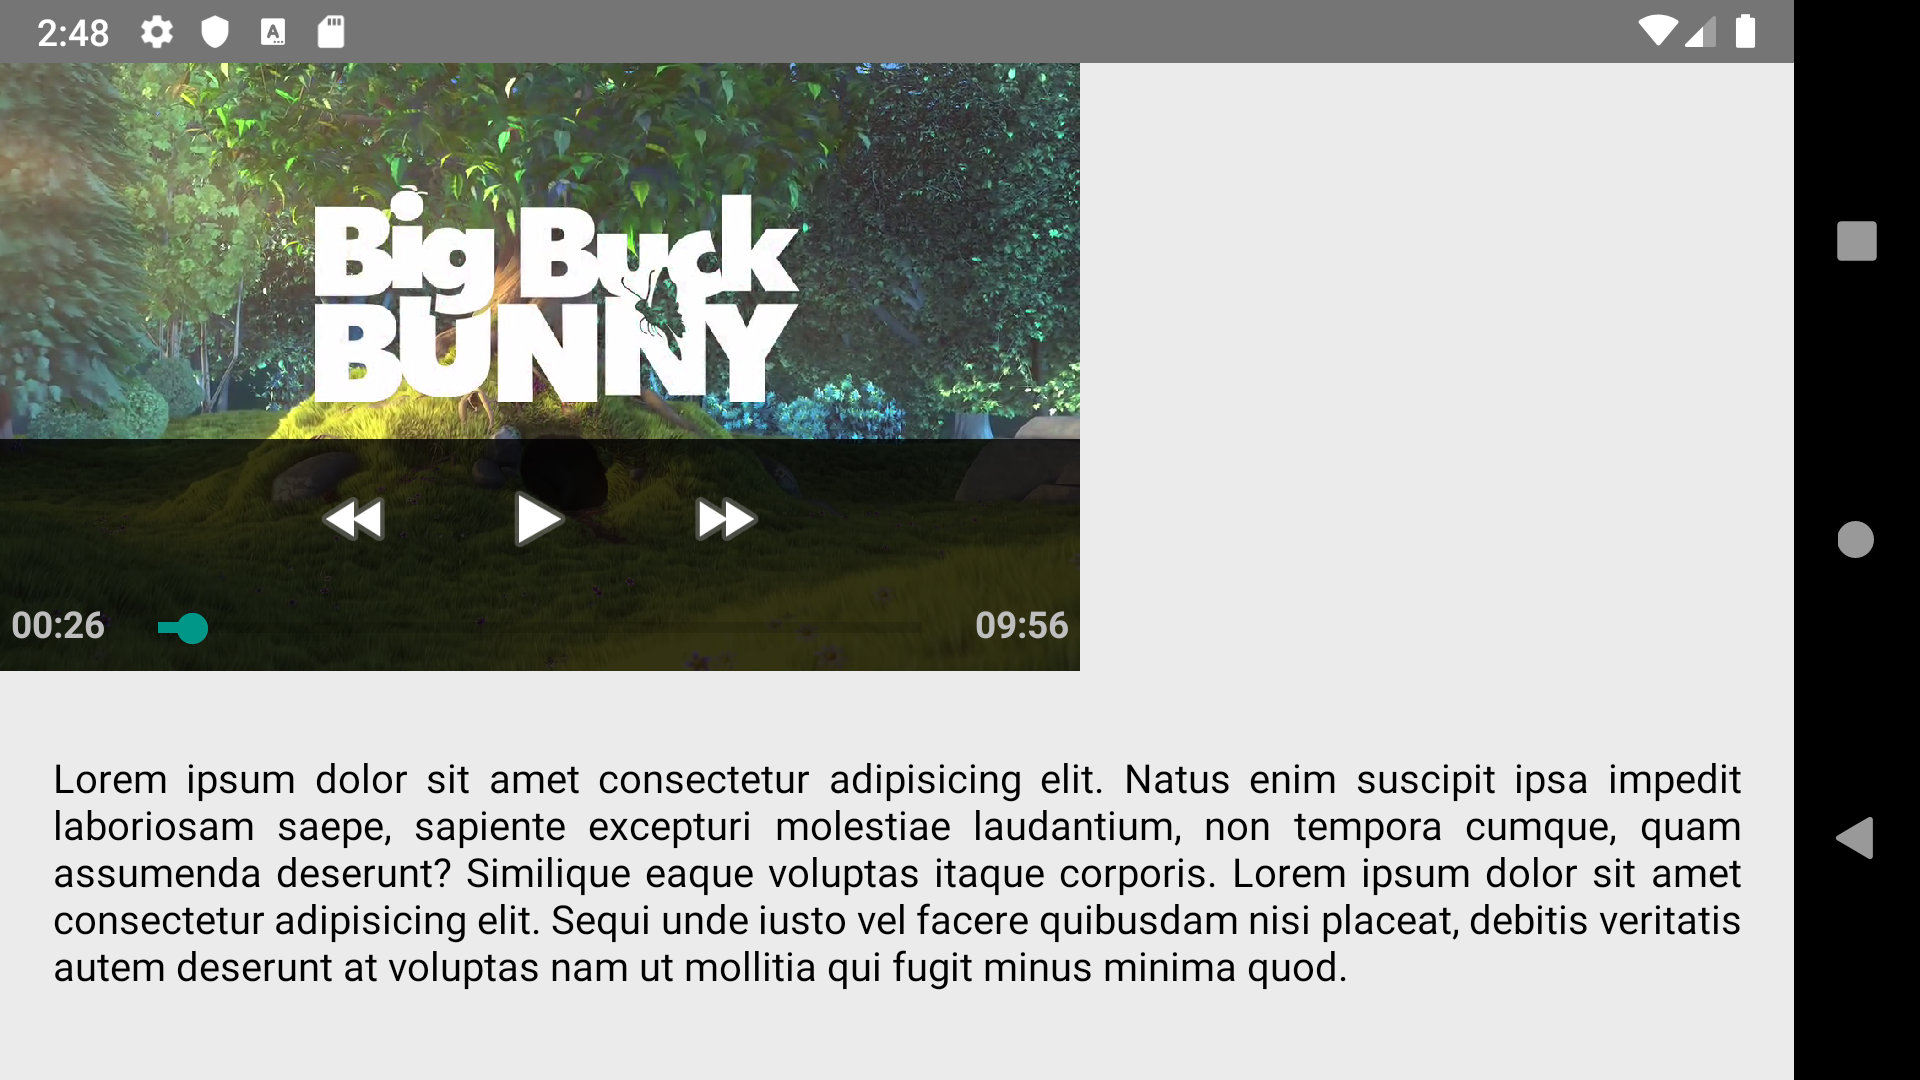
So, in this article, we are going to build something that works more like the iOS version and looks like this in fullscreen…
The most obvious thing that is missing is the fullscreen option on Android, but as it says in documentation:
“For Android MediaPlayer, you will need to build your own controls or use a package like react-native-video-controls or react-native-video-player.”
Those packages are actually perfectly fine, but I really didn’t need that many options so I choose to build my own.
For starters, we’re going to create platform-specific files for code purity, because we’ll have to get our hands dirty for a fullscreen Android video player.
So, the functionalities we’ll have to build are:
- Fullscreen on orientation change
- Fullscreen on button press
- Custom controls
- Progress bar
List of packages we are going to use:
1. Fullscreen on orientation change
While I was playing around with this, I was thinking about how other popular video players handle their change to fullscreen so I’m going to start with fullscreen on rotation change.
Firstly, we need to install and setup react-native-orientation-locker so we can have control over screen orientation in every moment, even if the user disabled auto-rotate.
We are going to check the device position and according to that set fullscreen mode or not. We’ll also need to hide the status bar on fullscreen. To accomplish that, we will need to attach an orientation change listener to the component in the componentDidMount method (or a comparable useEffect for functional component fans).
function handleOrientation(orientation: string) {
    orientation === 'LANDSCAPE-LEFT' || orientation === 'LANDSCAPE-RIGHT'
      ? (setState(s => ({...s, fullscreen: true})), StatusBar.setHidden(true))
      : (setState(s => ({...s, fullscreen: false})),
        StatusBar.setHidden(false));
}useEffect(() => {
// This would be inside componentDidMount()
Orientation.addOrientationListener(handleOrientation);
return () => {
// This would be inside componentWillUnmount()
Orientation.removeOrientationListener(handleOrientation);
};
}, []);typescriptAs you can see, we installed one module, created one handler, Effect Hook, State Hook, and different styling is also needed just so we can play video in fullscreen if a device is in landscape mode. And that’s just the tip of an iceberg (so to speak).
2. Fullscreen on button press
Now that we have fullscreen capabilities on rotation, we can build upon it and add a button that will force device orientation to our needs.
So the next thing to do is to add a fullscreen button.
Personally, I’ve used svg icons for buttons and if you want to know how to set them up in RN you can find the process HERE.
We are going to use Orientation once again for locking to landscape or unlocking all orientations onPress. Needless to say, but this will not work without orientation listener we did on our last step
 function handleFullscreen() {
    state.fullscreen
      ? Orientation.unlockAllOrientations()
      : Orientation.lockToLandscapeLeft();
  }
Basically, this is everything that I needed but why stop here? Let’s figure out how to make custom controls and progress bar.
3. Custom controls
Most basic controls that we can have are play and pause, but for good measure, we are going to add previous/next and skip back/forward controls.
Example:
<View style={styles.wrapper}>
    {showPreviousAndNext && (
      <TouchableOpacity
        style={[styles.touchable, previousDisabled && styles.touchableDisabled]}
        onPress={onPrevious}
        disabled={previousDisabled}>
        <VideoPrevious />
      </TouchableOpacity>
    )}

    {showSkip && (
      <TouchableOpacity style={styles.touchable} onPress={skipBackwards}>
        <VideoSkipBack />
      </TouchableOpacity>
    )}

    <TouchableOpacity
      style={styles.touchable}
      onPress={playing ? onPause : onPlay}>
      {playing ? <VideoPause /> : <VideoPlay />}
    </TouchableOpacity>

    {showSkip && (
      <TouchableOpacity style={styles.touchable} onPress={skipForwards}>
        <VideoSkipForward />
      </TouchableOpacity>
    )}

    {showPreviousAndNext && (
      <TouchableOpacity
        style={[styles.touchable, nextDisabled && styles.touchableDisabled]}
        onPress={onNext}
        disabled={nextDisabled}>
        <VideoNext />
      </TouchableOpacity>
    )}
  </View>
Disabled props are here if you want to do a video player with multiple videos so you can disable the previous or next button at the beginning or at the end of the playlist.
Now, let’s go back to the video player component and set video controls to false, or just remove controls={true} because it defaults to false. Import PlayerControls and use whatever option you need.
I’m going to use play/pause and skipBackwards/skipForwards.
These are the handlers we need to use for that:
function handlePlayPause() {
    // If playing, pause and show controls immediately.
    if (state.play) {
      setState({...state, play: false, showControls: true});
      return;
    }

    setState({...state, play: true});
    setTimeout(() => setState(s => ({...s, showControls: false})), 2000);
  }

  function skipBackward() {
    videoRef.current.seek(state.currentTime - 15);
    setState({...state, currentTime: state.currentTime - 15});
  }

  function skipForward() {
    videoRef.current.seek(state.currentTime + 15);
    setState({...state, currentTime: state.currentTime + 15});
  }
Play and pause are pretty straightforward, just need one boolean value that will tell our player if the video is supposed to be playing or not.
For skipping n amount of seconds forward or backward we will need to seek help from trusty ol’ refs. But fear not, as stated in official docs, there are a few good use cases for refs and one of them is media playback.
Now that we have access to video player properties we can use them for our custom controls and add or remove 15 seconds from the current video time.
I’m not going to cover the previous/next video but the PlayerControls component still has that options if you need it.
4. Progress bar
The last thing on our list is to make a custom progress bar, and for that, I’m going to use react-native-slider .
This will be a bit more complex component because we will need to calculate the time but it’s fairly simple so let’s dive in.
Duration and currentTime are passed from the parent component and those values will be used to calculate the current time in the video and duration of the video in minutes.
function getMinutesFromSeconds(time: number) {
    const minutes = time >= 60 ? Math.floor(time / 60) : 0;
    const seconds = Math.floor(time - minutes * 60);

    return `${minutes >= 10 ? minutes : '0' + minutes}:${
      seconds >= 10 ? seconds : '0' + seconds
    }`;
  }
This function will output the format that we need for displaying the time below the progress bar but only in minutes, if you have media that is hours long, you’ll have to write your own.
In the video player component, we need to add onLoad, onProgress, and onEnd to the video element. First, we can set duration and currentTime when the video is loaded, onProgress we are getting the current time in the video, and onEnd we are just pausing the video so it doesn’t repeat and setting it back to start.
function onLoadEnd(data: OnLoadData) {
    setState(s => ({
      ...s,
      duration: data.duration,
      currentTime: data.currentTime,
    }));
  }

  function onProgress(data: OnProgressData) {
    setState(s => ({
      ...s,
      currentTime: data.currentTime,
    }));
  }

  function onEnd() {
    setState({...state, play: false});
    videoRef.current.seek(0);
  }
So we are passing the current time and duration of the video, but we still didn’t handle the most important feature of a progress bar…
That little slider that shows us the current position in the video and how much of the video we still have left. That little slider that lets us press anywhere on that thin line and the video jumps right to it. And let’s not forget, that little slider which lets you slide to a precise moment in the video if you, for whichever reason, want to do just that.
function onSeek(data: OnSeekData) {
    videoRef.current.seek(data.seekTime);
    setState({...state, currentTime: data.seekTime});
  }
Pass this function to the onValueChange event in the Slider component and that’s it! The final piece of the Android solution is in.
To sum up, besides all of the explained functionalities, there are still a lot of things you can do to improve React Native video on Android.
You can find full code HERE, hope it will help you! :)
Feel free to suggest other solutions or a better way to do those things, because, after all, we are all here to learn new things and to develop better apps and ourselves. Write the comment and share your thoughts about this topic or you can drop us an email at hello@prototyp.digital. And don’t forget to visit us at https://prototyp.digital.
Thanks to Luka Buljan.