React Native SVG Image & ClipPath
I’d like to share our experiences with using react-native-svg and clipPath in React Native. There are a couple of tutorials about this, but I found them kind of hard to understand or they don’t cover specifics of Android and/or iOS, and just focus on a single platform.


How to clip an image using a custom path in react-native-svg.
As promised in the previous article I’d like to share our experiences with using react-native-svg and clipPath in React Native. There are a couple of tutorials about this, but I found them kind of hard to understand or they don’t cover specifics of Android and/or iOS, and just focus on a single platform.
Here’s how to do this, on both platforms, using react-native-svg's clipPath
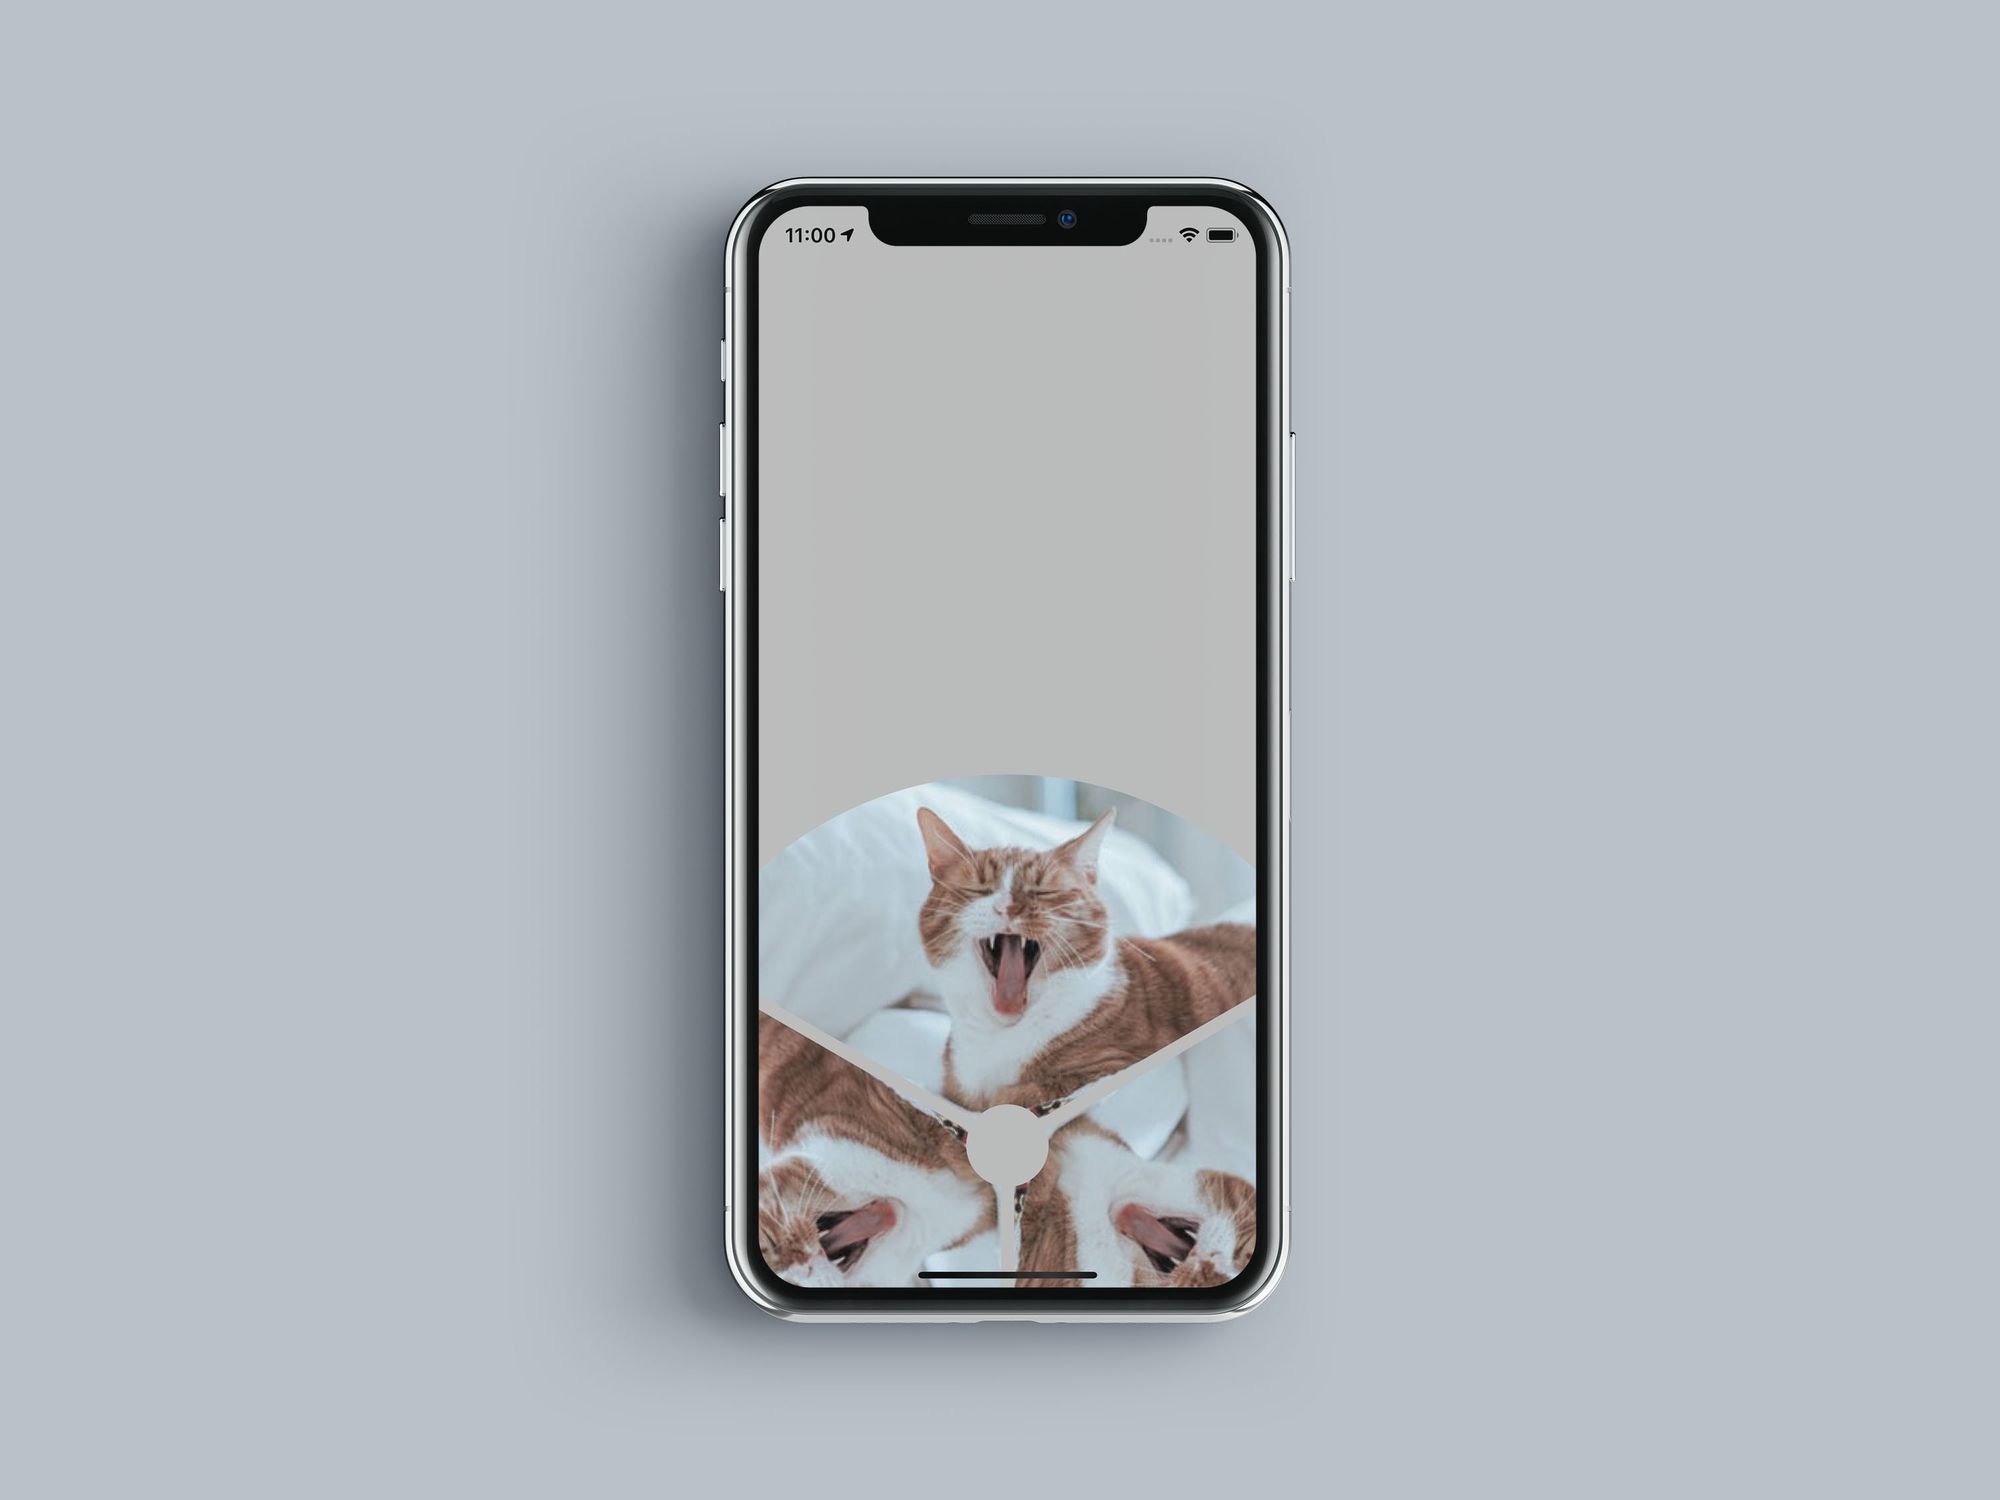
First, you need to create this (or any other) shape in any vector drawing software, and export it as SVG. Here’s how it looks like exported from Adobe Illustrator:
<?xml version="1.0" encoding="utf-8"?>
<!-- Generator: Adobe Illustrator 21.1.0, SVG Export Plug-In . SVG Version: 6.00 Build 0)  -->
<svg version="1.1" id="Layer_1" xmlns="http://www.w3.org/2000/svg" xmlns:xlink="http://www.w3.org/1999/xlink" x="0px" y="0px" viewBox="0 0 828.2 827.8" style="enable-background:new 0 0 828.2 827.8;" xml:space="preserve">

<path d="M762.2,189.9c-17.4-27.1-38.1-52.2-61.3-74.5c-23.9-22.9-50.8-43.1-79.8-59.8C528.3,2,419.9-13.5,315.9,11.9 c-50.6,12.4-97.8,33.8-140.2,63.6C131.9,106.3,95,144.9,65.9,190.1c-0.1,0.2-0.2,0.3-0.3,0.5c-3.4,5.8-1.4,13,4.4,16.4l308.3,178 c8.4-10.4,21.3-17.1,35.8-17.1c14.4,0,27.2,6.6,35.6,16.9l308.4-178c1.9-1.1,3.4-2.6,4.5-4.4C764.8,198.5,764.7,193.7,762.2,189.9z"/>

</svg>
It contains a lot of junk like comments, headers, and other superfluous stuff which we don’t need. But we need the generated path value as well as viewBox size. Save those.
As stated in documentation available here you must put clipPath inside defs element of the SVG which is used to store graphical objects that will be used later on (more on that here).
For our example, it looks like this:
<Defs>
    <ClipPath id="clipPath">
    <Path fill="white" stroke="gray" strokeWidth="3"
        d="M762.2,189.9c-17.4-27.1-38.1-52.2-61.3-74.5c-23.9-22.9-50.8-43.1-79.8-59.8C528.3,2,419.9-13.5,315.9,11.9 c-50.6,12.4-97.8,33.8-140.2,63.6C131.9,106.3,95,144.9,65.9,190.1c-0.1,0.2-0.2,0.3-0.3,0.5c-3.4,5.8-1.4,13,4.4,16.4l308.3,178 c8.4-10.4,21.3-17.1,35.8-17.1c14.4,0,27.2,6.6,35.6,16.9l308.4-178c1.9-1.1,3.4-2.6,4.5-4.4C764.8,198.5,764.7,193.7,762.2,189.9z"/>
    </ClipPath>
</Defs>
After that, you must define Image which will be used to fill this area (an image that will be clipped by this path) and apply clipPath id to it so that the image knows which element to refer to.
The trick here is that you must wrapImageelement with a Group element (G) in order for it to work on iOS, but without G for it to work on Android.
Here’s an example:
{Platform.OS === 'ios' ? (
    <G clipPath="url(#clipPath)">
        <Image
            x="0"
            y="0"
            width="100%"
            height="100%"
            preserveAspectRatio="xMidYMid slice"
            href={{ uri: 'image url here'}} />
    </G>
) : (
    <Image
        clipPath="url(#clipPath)"
        x="0"
        y="0"
        width="100%"
        preserveAspectRatio="xMidYMid slice"
        href={{ uri: 'image url here'}}/>
)}
For some reason, Android Image just doesn’t like being wrapped in G (it doesn’t clip properly), and if you add clipPath directly to the Image on iOS it will just fail to compile using Typescript. So there’s that.
I’ve used Platform module directly from react-native to detect the platform and apply changes accordingly. Note the clipPath reference to the path defined above using id which is defined in the path object.
Besides that, you just need to wrap it inside the SVG object containing the same ViewBox dimensions as in the exported SVG object from the start. You can find the entire example here: https://codesandbox.io/s/q8rn840nxq. It’s not runnable directly in the browser, sorry.
And that’s it. It’s quite simple, but somehow tutorials fail to provide all the steps for this to work out of the box for all platforms. I hope this helps!
Want to get in touch? Drop us an email at hello@prototyp.digital or visit us at https://prototyp.digital. Feel free to point out if something is incorrect or you have a better way of doing stuff, we’re all here to learn :) Thanks!
Thanks to Luka Buljan.